
MARMIND® provides many elements in which data can be stored as well as information managed and processed. If you still lack something, you can put together your own custom elements like a "kit".
The "parts" for this “kit” can be found in the settings (see right: navigation tree) under "Custom & standard panels" subsection "custom fields".
The application of these kits in a specific marketing object as well as the compilation of mutations are described in chapter Custom panel.
This part describes each custom item and how it is assembled.
Custom items (fields, groups, panels) – general information
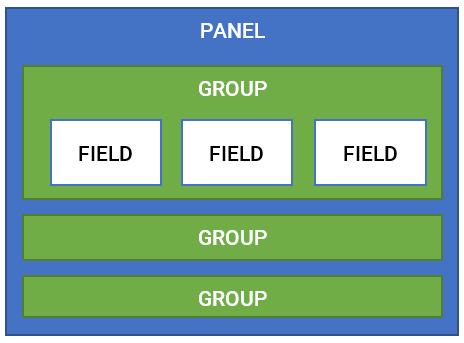
For the display of a custom panel in the detail area, the individual blocks must be defined. The structure is nested and the schema below explains how these building blocks fit together:
- A panel consists of at least one group. In order to create a panel, groups must therefore have been created first
- A group, in turn, consists of at least one field. In order to create a group, fields must have been created.
- A field is the smallest building block of the custom elements.
The following describes the installation of the individual blocks (field, group, panel) and the compilation of "kits".
Important note
Custom fields, groups or panels created in the settings cannot be deleted. However, items that you no longer want to use can be set inactive.
Create a custom field
The first item to be created is the custom field. Make sure that you navigated to the appropriate area ("custom fields") in the custom fields settings (1).
Click on "add new custom field" (2) - the pop-up "create new custom field" opens (3).
Give a unique name (e.g., "text box max. 50 characters") - this can only be assigned once. The "description" reflects the display name in MARMIND®.
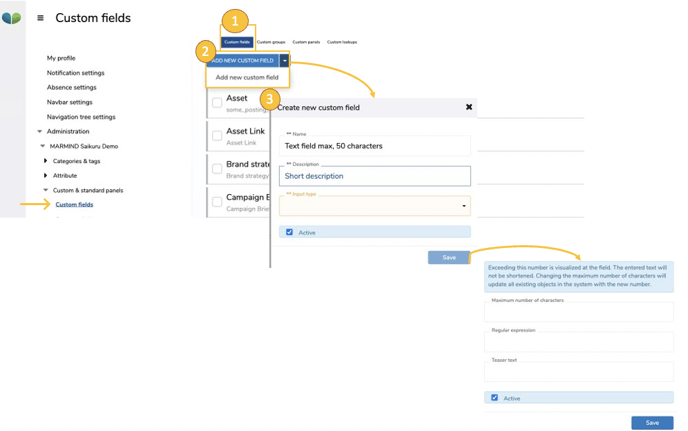
In the example on top, you can see the object:
- Name: Text box max. 50 characters
- Description: Meaningful display name
- Input type: Text area
- maximum number of characters: 50
Depending on the input type, another field may appear when you save your new custom field.
Custom lookups
A special field type is the so-called "lookup". This is a selection field (dropdown) in which - depending on the restriction - individual or multiple values can be selected.

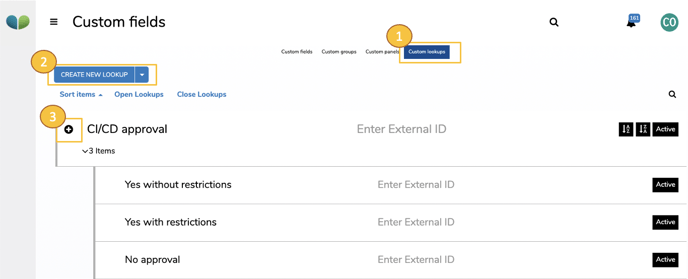
To be able to select values, they must first be defined. This is done under the menu "Custom lookups " (1). Add a new list of values by clicking on "create new lookup" (2). Values must be defined for each lookup: Add these by clicking on the "+" icon (3).
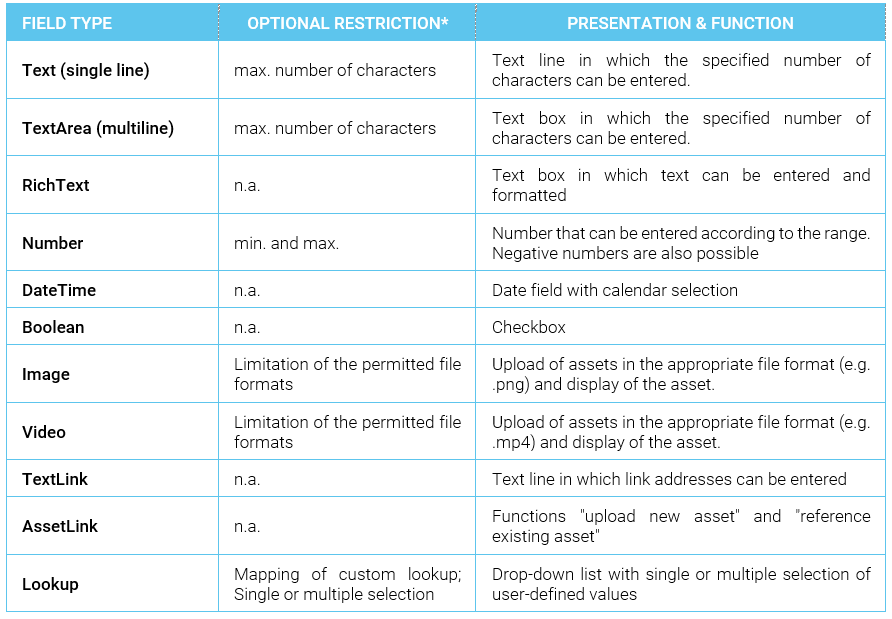
The table below lists all field types with additional optional restrictions:
Clicking on “Save” creates the field and appears in the list.
Create a custom group
To add groups to panels, they must be created in advance in the custom groups panel. Click "add new custom group" (1) in the tab "Custom groups" (2) – the pop-up "create custom group" opens (3).
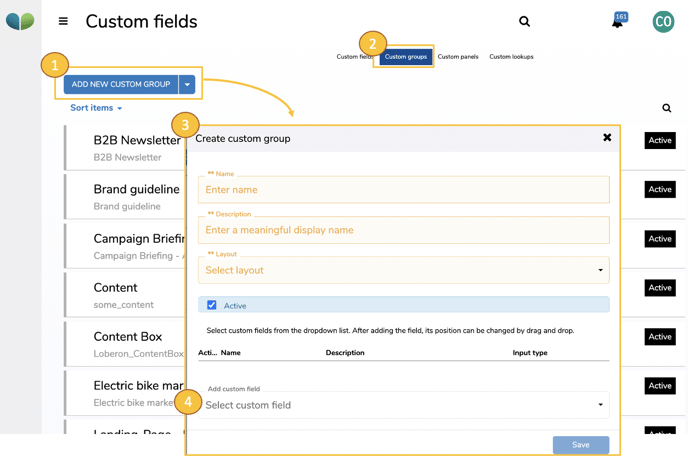
Give a unique name (for example, "a text box and an image - 1 column"). The "description" reflects the display name in MARMIND®.
For "Layout" you select the arrangement of the fields within a group:
- Col-1: the field elements are displayed one underneath the other (one column)
- Col-2: two field elements are displayed side by side
- Col-3: three field elements are displayed side by side
Note: The field types "Image", "Video" and "AssetLink" are always displayed in the Col-1 format.
The previously defined fields can now be selected from the drop-down list (4). A specific field can only be added once for each group. However, a field can occur multiple times within different groups.
The order of the fields within a module can be changed by drag and drop.
By clicking on "save" the group is created and appears in the list.
Tip
Groups already used in MARMIND® can be changed later in the settings (admin). This does not change existing content in the objects. Only when creating new items (e.g. new mutations) do the changes of these groups become visible.
Similarly, newly added fields are immediately added as empty, new fields in the objects of already existing groups.
Create a custom panel
After creating the groups, the building blocks for panels are now available. Go to the custom panels tab (1) and click on “add new custom panel” (2). The pop-up "create custom panel" opens (3).

Give a unique name for the panel and a display name under “description”.
You can also restrict the respective panel to object types: for example, limit it to the “Action” object type so that the panel can only be linked in action categories.
Important note
There is an additional restriction for the “Project” object type: While a panel can be linked to any number of object categories for other object types, the “Project” object type is always limited to ONE panel per project category.
Now add the groups you want from the drop-down menu. Multiple selections (select a group multiple times) is possible. Drag-and-drop the groups.
The “fixed groups” option allows the groups defined for the panel to provide a "bundle." If this option is selected, the user cannot delete the groups when adding the panel to an object. This is especially interesting in combination with action categories.
Add custom panels to action categories
Custom panels are paired with action categories. To do this, go to projects, channels & actions (action categories) in the settings and either "create a new action category" or edit an existing action category (see chapter Projects & Actions (categories and channels)).
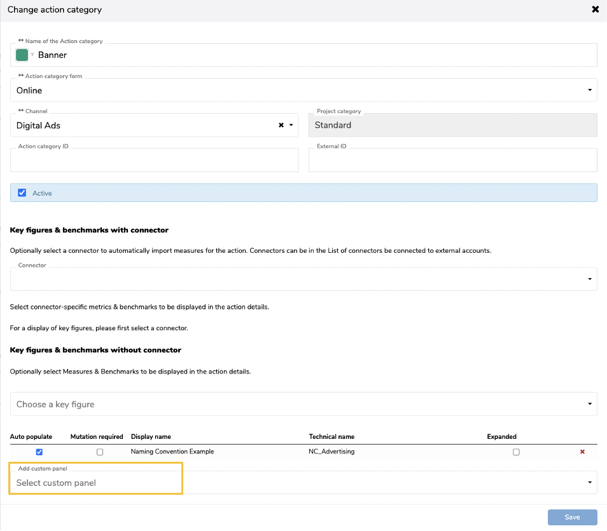
In the "create new action category" pop-up (or "change action category") there is a drop-down menu on the bottom to select the custom panels. Multiple selections are possible here.
By clicking on "save" the panels are now available in the corresponding action category. If you create an appropriate action in the MARMIND® area, the panel (or panels) will be displayed in the details area. How the panels can now be used is described in chapter Custom panel.
Progress fields
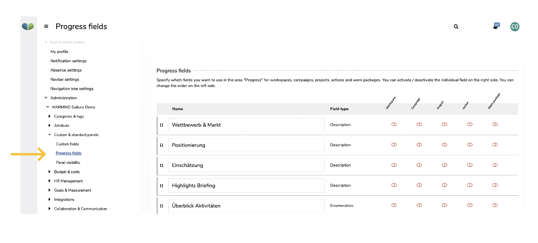
Additonally, the fields of the "Progress" panel in the MARMIND® area can be adjusted in the menu "Custom & standard panels". To do this, go to "Progress Fields" in the navigation tree.
The following settings can be adjusted by an admin user:
- Change the name
- Activate/deactivate a field per object type (toggle)
- Order of fields (Drag & Drop –
 -symbol)
There are 10 fields to choose from- five with the enumeration field type (1) and five with the description field type (2).
The progress panel are displayed in the Detail module and in the cockpit pop-up.