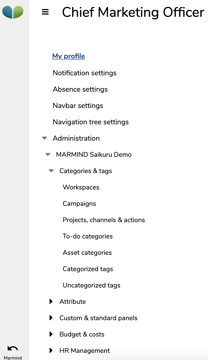
To numerous MARMIND® elements, you can assign categories (sometimes called “types”). This not only allows an individual structure but also makes an evaluation according to company-specific requirements possible. The administration of these categories is found under "Categories & tags".
Workspace categories
You can define workspace categories by clicking on “Workspaces” in the administrator setting mode. To do so choose the dropdown menu and click on “Add New Workspace Category”.
Important note
Define at least one workspace category to be able to create workspaces in the marketing context.
You can optionally assign custom panels to a workspace category.
Campaign categories
You can define categories for your campaigns under "Campaigns" in the settings. Create a campaign category by clicking on "Add New Campaign Category" in the drop-down menu. An input window opens in which you can define the name and color of the campaign category. The color of the campaign category can be displayed as a bar color in the plan.
Important note
Define at least one campaign category in order to be able to create campaigns in the context.
You can also optionally assign custom panels to a campaign category.
Excursus: Assigning custom panels to object categories
When assigning custom panels to object categories, two aspects can be defined that affect other functions in the context:
- Auto populate (should always be activated).
- Mutation required
Mutations appear like tabs in a panel and the same or different groups can be configured in the context. If this option should be available, this checkbox must be selected (1).

Projects & Actions (categories and channels)
In the settings you can manage project categories, channels and action categories. To do this, click on "Projects, channels & actions" (1) in the navigation tree.
Project categories:
To manage project categories, go to the "Project categories" tab (2). The “Standard” category appears here by default.
Important note
At least one project category must be defined in order to be able to create projects in the context.
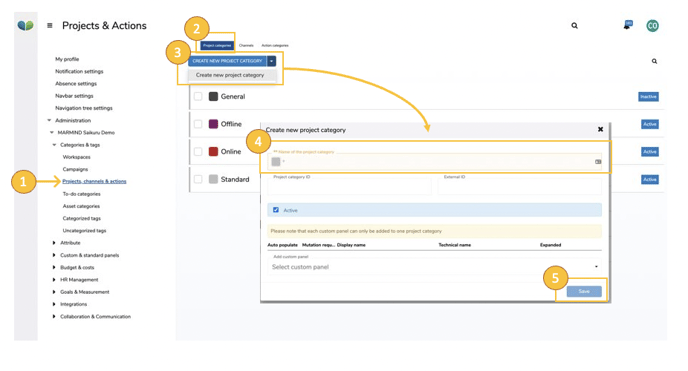 Click on "Create new project category" (3) and the corresponding input window will open. In the input mask you assign a name and a color (4). You can optionally assign a custom panel to the project category.
Important note
A user-defined panel can only be linked once to a project category. A panel that has already been set no longer appears in the selection list for further systems.
Finally click on “Save” (5) - the project category is now displayed in the list. You can edit the project category at any time. Click on the list entry and make the appropriate changes. Changes are also adopted in the context of existing projects.
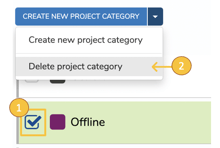
To delete a project category, mark the list entry (1) and click on "Delete project category" (2) in the next steps menu. Make sure beforehand that this is not used in the context. Alternatively, you can also deactivate the project category.
Channels:
To manage channels, go to the "Channels" tab (1). By default, there are various channels that you can edit at any time.
Important note
At least one channel must be defined in order to be able to create actions in the context.
Click on "Create New Channel" (2) and the corresponding input window will open. Assign a name and a color to your channel (3) and assign the project category (4) for which the channel is to be used.
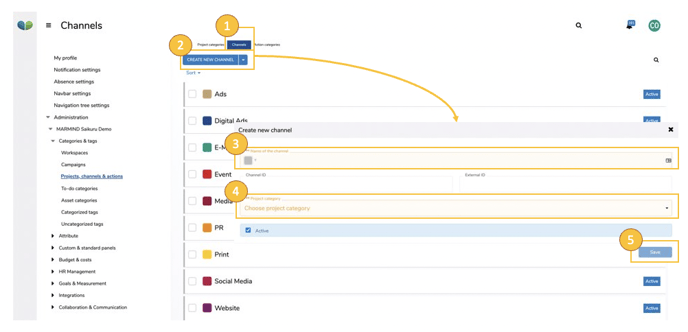
Click on "Save" (5) and the channel will be displayed in the list. You can also edit and delete channels afterwards.
Action categories:
To manage action categories, go to the "Action categories" tab (1). By default there are various action categories that you can edit at any time.
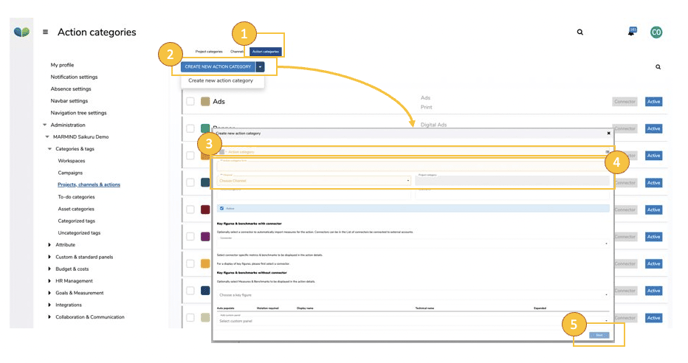
Click on "Create new action category" (2) and the corresponding input window will open. Enter a name and a color in the input mask (3).
Select the desired channel (4) in the selection field - the associated project category is displayed - and the corresponding action category form and optionally assign an ID for the form. The “Action category form” is firmly defined in MARMIND®: In the context, this assignment has effects on the fields of an action in this category in the “Communication” and “Production” or “Organisation” panels. Which fields are generated by the respective form is described in detail in the chapter Action category forms.
Again, you can optionally add a custom panel. Finally click on “Save” (5) - the new action category is displayed in the list.
Additional function with Connector feature activated: Select key figures that are automatically added when new actions are created in the marketing context. Benchmark values can also be pre-defined for this purpose:
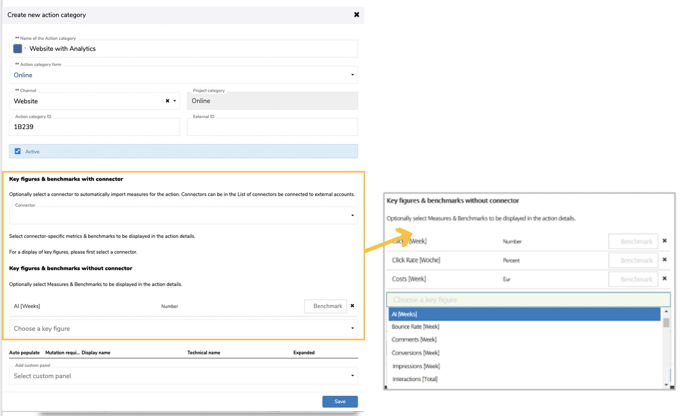
If you’d like to create an action category including a connector, choose it in this window and define the key figures which will then be automatically added to new actions. You can also assign custom fields to an action type – see chapter Create and manage custom fields, groups and panels.
Create & manage to-do and asset categories
Optionally categories for to-dos and assets can also be assigned. This enables corresponding filtering and opens up further possibilities for the users to filter and group these elements accordingly.
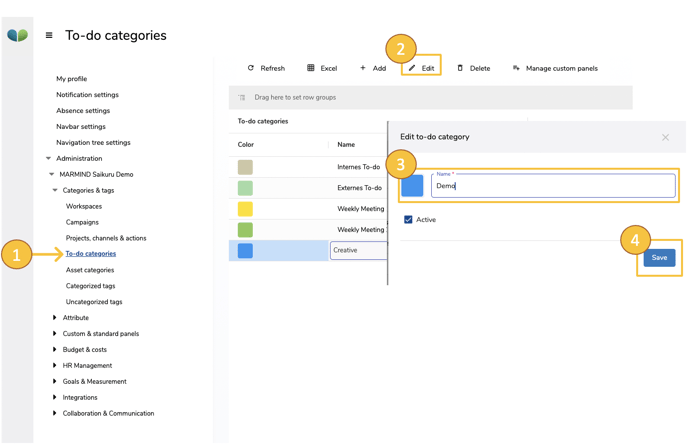
Go to "To-do categories" (1) in the navigation tree to adjust them accordingly. Click on "Add" in the toolbar or on "Edit" if you want to change and existing category(2). Then assign a name to the to-do category (3). Select a suitable color and click on "Save" (4). To delete a to-do category, click the "Delete" icon in the toolbar. You can optionally assign a custom panel to the to-do category by clicking on "Manage custom panels".
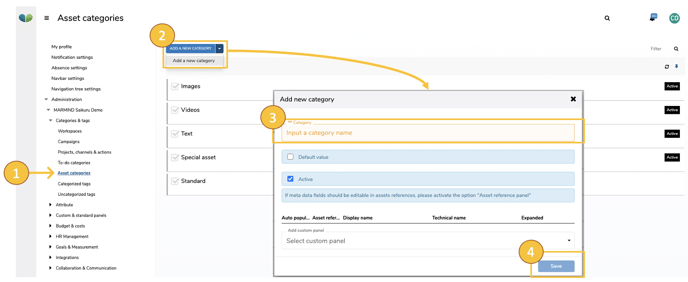
Go to "Asset categories" (1) and click on "Add a new category" (2). Enter a name (3) in the input window and click on "Save" (4). Again, you can optionally add a custom panel.
To delete an asset category, check the category to be deleted and select "Delete selected category" from the drop-down menu.
Creating and configuring tags (as master data)
In the settings, you can manage your keywords (tags). Summarize multiple keywords under one tag category – here's how it works: Go to "Categorized Tags" in the settings (1). There you can “create a tag category” (2) above the list. A new group row appears in the list. This is a parent category of individual tags (keywords).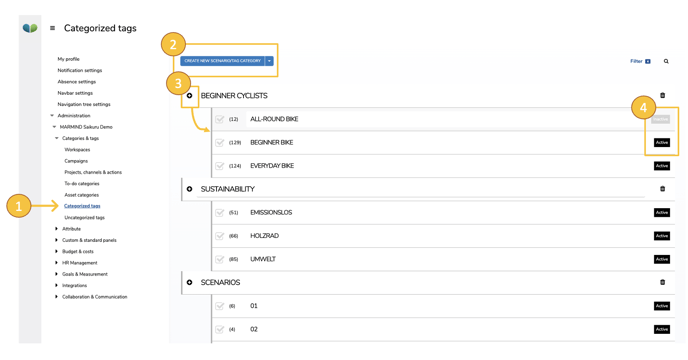
To add tags to a tag category, click on the “+” symbol (3) for the category - a new line will appear under the group line. You can also (de)activate individual keywords by clicking on "Active" / "Inactive" in the corresponding line (4).
To delete individual tags, check the tags to be deleted and select "Delete selected tag" from the drop-down menu. To delete an entire tag category, click the  -icon.
